Rust로 점메추 / 저메추 api 제작기
긴 삽질로 자동화에 성공
해서 꽤 오랜 기간(2020년 12월
부터 약 3년) 탱구와 윈터가 프로필 최상단에서 손을 흔들며 반겨줬습니다.
제 팬심에는 아무런 이슈가 없으나, 해가 거듭될수록 늘어가는 사회적 무게, 외부적 압박 등으로 인해 근 3년 만에 해당 영역을 다른 이미지로 교체하게 되었습니다.
TypeScript나 PHP도 이미 많이 써봤고, C#을 써볼까 Rust를 써볼까 하다 Rust를 골랐습니다. 알고리즘 문제 풀 때처럼 짧은 코드 작성할 때만 몇 번 써보고, 애플리케이션을 만들어보는 건 처음입니다.
’컴파일만 되면 된다’는 안정감을 주는 게 매력적이라 조금씩 사용해보고 있는데, Tauri와 Yew를 사용해 데스크탑 애플리케이션 제작을 시도하다 접어둔 직후라 더더욱 끌리기도 했습니다.
아무래도 언어의 컨셉 자체가 프론트 애플리케이션을 만들기엔 그리 적합한 형태가 아니지 않을까…싶습니다.
Public API 물색
생각보다 데이터베이스화된 메뉴를 찾는 게 쉽지 않습니다.
비슷한 류의 애플리케이션들을 찾아봐도, 비슷비슷한 메뉴들을 추천하는 터라 그냥 하나 만들어야 하나…하던 와중에 The Meal DB
라는 사이트를 찾았습니다.
{
    "meals": [
        {
            "idMeal": "53054",
            "strMeal": "Seri muka kuih",
            "strDrinkAlternate": null,
            "strCategory": "Dessert",
            "strArea": "Malaysian",
            "strInstructions": "Soak glutinous rice with water for at least 1 \u00bd hours prior to using. Drain.\r\nPrepare a 9-inch round or square cake pan and spray with cooking spray or line with plastic wrap.\r\nMix coconut milk, water, salt and the rice. Pour it into cake pan, topped with the pandan knots.\r\nSteam for 30 minutes.\r\nAfter 30 minutes, fluff up the rice and remove pandan knots. Then, using a greased spatula, flatten the steamed rice. Make sure there are no holes/air bubbles and gaps in the rice, especially the sides.\r\nSteam for another 10 minutes.\r\n\r\nCombine pandan juice, coconut milk, all purpose flour, cornflour, and sugar. Mix well.\r\nAdd eggs and whisk well then strain into a medium sized metal bowl or pot.\r\nPlace pandan mixture over simmering water (double boiler or bain-marie)\r\nStir continuously and cook till custard starts to thicken. (15 minutes)\r\nPour pandan custard into glutinous rice layer, give it a little tap (for air bubbles) and continue to steam for 30 minutes.\r\nRemove kuih seri muka from the steamer and allow to cool completely before cutting into rectangles or diamond shapes.",
            "strMealThumb": "https://www.themealdb.com/images/media/meals/6ut2og1619790195.jpg",
            "strTags": null,
            "strYoutube": "https://www.youtube.com/watch?v=_NJtCfqgaBo",
            "strIngredient1": "Rice",
            "strIngredient2": "Coconut Milk",
            "strIngredient3": "Water",
            "strIngredient4": "Salt",
            "strIngredient5": "Corn Flour",
            "strIngredient6": "Flour",
            "strIngredient7": "Eggs",
            "strIngredient8": "Coconut Cream",
            "strIngredient9": "Sugar",
            "strIngredient10": "",
            "strIngredient11": "",
            "strIngredient12": "",
            "strIngredient13": "",
            "strIngredient14": "",
            "strIngredient15": "",
            "strIngredient16": "",
            "strIngredient17": "",
            "strIngredient18": "",
            "strIngredient19": "",
            "strIngredient20": "",
            "strMeasure1": "400g",
            "strMeasure2": "150ml",
            "strMeasure3": "100ml",
            "strMeasure4": "1 tsp ",
            "strMeasure5": "5 tbs",
            "strMeasure6": "3 tbs",
            "strMeasure7": "3",
            "strMeasure8": "200ml",
            "strMeasure9": "140g",
            "strMeasure10": " ",
            "strMeasure11": " ",
            "strMeasure12": " ",
            "strMeasure13": " ",
            "strMeasure14": " ",
            "strMeasure15": " ",
            "strMeasure16": " ",
            "strMeasure17": " ",
            "strMeasure18": " ",
            "strMeasure19": " ",
            "strMeasure20": " ",
            "strSource": "https://makan.ch/recipe/kuih-seri-muka/",
            "strImageSource": null,
            "strCreativeCommonsConfirmed": null,
            "dateModified": null
        }
    ]
}
심지어 무작위 메뉴를 내려주는 api도 있습니다.
좀 더 사용자의 상황에 맞게 접근한 지역 날씨에 맞춰서, 원하는 메뉴 카테고리 내의 메뉴를 추천하고 싶은 마음도 있지만, 만드는 게 이미지를 출력하는 애플리케이션이다 보니 아무래도 사용자의 상황에 맞춰 다른 메뉴를 추천해준다는 게 거의 불가능에 가깝습니다.
따라서 안타깝게도…냅다 아무런 메뉴나 추천하게 제작했습니다.
초기 제작 과정
템플릿 제작
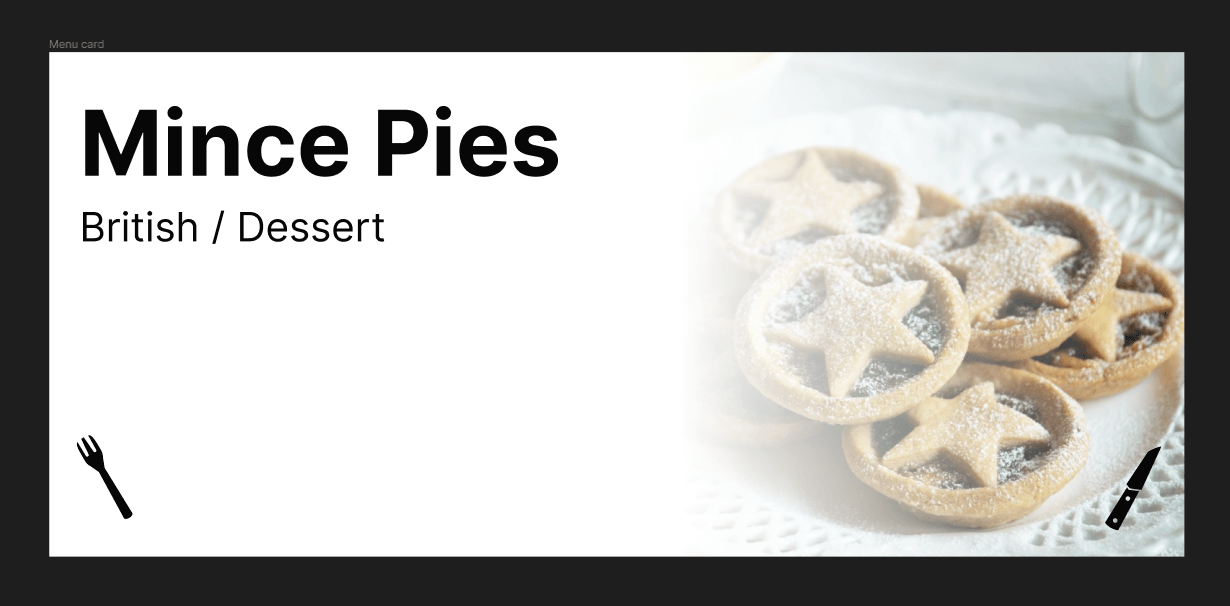
오래간만에 저주받은 디자인 실력을 뽐내기 위해 Figma를 켰습니다.
사실 넣을만한 요소가 음식 이름 / 사진 / 분류 정도 뿐이라, 디자인이라고 할만한 게 별로 없습니다.
너무 밋밋하지 않게 사진 위에 그래디언트만 하나 얹어주고, 포크나 나이프 등으로 꾸며볼까 하다 저 같은 사람이 디자인에 욕심내면 화를 부르는 게 일반적이라 그냥 다 치웠습니다.
let mut handlebars = Handlebars::new();
let svg_template = r##"<svg
    width="{{svg_width}}"
    height="200"
    viewBox="0 0 {{svg_width}} 200"
    fill="none"
    xmlns="http://www.w3.org/2000/svg"
    xmlns:xlink="http://www.w3.org/1999/xlink"
>
    <defs>
        <style>
            text { stroke: none; font-family: -apple-system, BlinkMacSystemFont,
                'Apple SD Gothic Neo', 'Malgun Gothic', '맑은 고딕', arial, sans-serif }
        </style>
    </defs>
    <g clip-path="url(#clip0_1_2)">
        <rect width="{{svg_width}}" height="200" fill="{{background_color}}" />
        <mask
            id="mask0_1_2"
            style="mask-type: alpha"
            maskUnits="userSpaceOnUse"
            x="{{image_x}}"
            y="0"
            width="200"
            height="200"
        >
            <rect
                x="{{image_x}}"
                width="200"
                height="200"
                fill="url(#paint0_linear_1_2)"
            />
        </mask>
        <g mask="url(#mask0_1_2)">
            <rect x="{{image_x}}" width="200" height="200" fill="url(#pattern0)" />
        </g>
    </g>
    <text
        x="12"
        y="50"
        font-size="36"
        fill="{{text_color}}"
        clip-path="url(#title)"
        font-weight="bold"
    >
        {{meal_name}}
    </text>
    <text
        x="12"
        y="76"
        font-size="16"
        fill="{{text_color}}"
        clip-path="url(#description)"
    >
        {{meal_country}} / {{meal_category}}
    </text>
    <clipPath id="title">
        <rect x="12" y="12" width="{{text_width}}" height="60" fill="black" />
    </clipPath>
    <clipPath id="description">
        <rect x="12" y="58" width="{{text_width}}" height="18" fill="black" />
    </clipPath>
    <defs>
        <pattern
            id="pattern0"
            patternContentUnits="objectBoundingBox"
            width="1"
            height="1"
            x="{{image_x}}"
        >
            <use xlink:href="#image0_1_2" transform="scale(0.005)" />
        </pattern>
        <linearGradient
            id="paint0_linear_1_2"
            x1="{{svg_width}}"
            y1="100"
            x2="{{image_x}}"
            y2="100"
            gradientUnits="userSpaceOnUse"
        >
            <stop offset="0" />
            <stop offset="1" stop-opacity="0" />
        </linearGradient>
        <clipPath id="clip0_1_2">
            <rect width="{{svg_width}}" height="200" fill="{{background_color}}" />
        </clipPath>
        <image
            id="image0_1_2"
            width="200"
            height="200"
            xlink:href="{{meal_thumbnail}}"
        />
    </defs>
</svg>"##;

handlebars
    .register_template_string("svg_template", svg_template)
    .unwrap();
완성된 svg를 handlebars로 옮기는 건 꽤 간단합니다.
’줄바꿈’이란 저희가 아주 당연하게 기대하는 기능이 없어 너비를 섬세하게 계산해줘야 하기에 각종 너비 관련 값들을 추가로 받아야 한다는 것만 제외하면, 내부에 들어갈 텍스트를 외부에서 주입할 수 있게만 수정해주면 끝입니다.
외부 api 호출
use base64::{engine::general_purpose, Engine as _};
use mime_guess::from_path;
use reqwest::{get, Error};
use serde::Deserialize;

#[derive(Deserialize, Debug, Clone)]
#[allow(non_snake_case)]
pub struct Meal {
    pub idMeal: String,
    // ...
    pub dateModified: Option<String>,
}

#[derive(Deserialize, Debug, Clone)]
pub struct ResponseData {
    pub meals: Vec<Meal>,
}

pub async fn fetch_random_food() -> Result<ResponseData, Error> {
    let mut response = get("https://www.themealdb.com/api/json/v1/1/random.php")
        .await?
        .json::<ResponseData>()
        .await?;
    let image_url = response.meals[0].strMealThumb.to_string();
    let image_response = get(&image_url).await?;
    let bytes = image_response.bytes().await?;
    let mime = from_path(&image_url).first_or_octet_stream().to_string();
    let encoded: String = general_purpose::STANDARD_NO_PAD.encode(&bytes);

    response.meals[0].strMealThumb = format!("data:{};base64,{}", mime, encoded);

    Ok(response)
}
어지간히 모던한 언어를 사용하면(JSON 파싱만 잘하면), 걸릴 게 크게 없는 부분입니다.
serde를 사용하면 Runtime에도 api 응답과 struct의 구조가 다르면 에러를 뱉어내기 때문에 , 스펙을 잘 정의해둬야 합니다.
추가로, SVG를 html 내에서 렌더링하는 게 아니라 이미지를 응답할 것이므로, http request를 보낼 수 없습니다.
따라서 주소를 그냥 첨부하지 말고, 이미지 데이터를 가져와 base64 인코딩도 진행해줘야 합니다.
SVG 렌더링
const SVG_WIDTH: usize = 450;
const IMAGE_WIDTH: usize = 200;
const TEXT_RIGHT_GUTTER: usize = 100;

// ...

// The SVG is 450px wide, but we want to make sure the text is always visible
// The character is 17px wide on most fonts
let svg_width = max(meal.strMeal.len() * 17 + (IMAGE_WIDTH - 20), SVG_WIDTH);
let image_x = svg_width - IMAGE_WIDTH;
let text_width = svg_width - TEXT_RIGHT_GUTTER;
let (text_color, background_color) = match &theme {
    Some(t) if t == "dark" => ("#bbb", "#121212"),
    Some(t) if t == "light" => ("#080808", "#fff"),
    _ => ("#bbb", "#121212"),
};

let data = [
    ("meal_name", meal.strMeal.to_string()),
    ("meal_country", meal.strArea.to_string()),
    ("meal_category", meal.strCategory.to_string()),
    ("meal_thumbnail", meal.strMealThumb.to_string()),
    ("svg_width", svg_width.to_string()),
    ("text_width", text_width.to_string()),
    ("image_x", image_x.to_string()),
    ("text_color", text_color.to_string()),
    ("background_color", background_color.to_string()),
]
.iter()
.cloned()
.collect::<HashMap<_, _>>();

handlebars.render("svg_template", &data).unwrap()
handlebars에 변수들을 추가할 차례입니다.
상술했듯 줄바꿈이 불가능해, SVG의 너비를 음식 이름 길이에 맞게 조정해줘야 하는데, 대부분 환경에서 글자 하나가 17px보다 커지지 않는 건 확인했는데, 아무래도 좀 안정적인 방식은 아니지 않나 싶긴 합니다.
[](https://github.com/marshallku/menu-today#gh-dark-mode-only) [](https://github.com/marshallku/menu-today#gh-light-mode-only)
theme을 설정할 수 있게 해뒀는데, github에서 hack이긴 하지만 위와 같이 링크에 gh-dark-mode-only, gh-light-mode-only hash를 추가하면 각각 다크모드 / 라이트모드에만 출력할 수 있도록 만들 수 있습니다.
display: none으로 가리는 거라, HTTP Request가 두 배로 발생한다는 단점이 있긴 하지만, 사용자의 github theme에 맞춰 이미지를 출력할 수 있습니다.
HTTP Request 처리
mod fetcher;
mod image;
mod render;

use actix_web::{get, middleware, web, App, HttpResponse, HttpServer, Responder};
use env_logger::Env;
use serde::Deserialize;
use std::time::Instant;

#[derive(Deserialize)]
pub struct SVGOption {
    theme: Option<String>,
}

#[get("/")]
async fn handle_request(query: web::Query<SVGOption>) -> impl Responder {
    let start_time = Instant::now();

    let data = fetcher::fetch_random_food().await.unwrap();
    let svg = render::render_svg(&data.meals[0], query.theme.clone()).await;

    println!(
        "Time taken for generating image: {:?}",
        start_time.elapsed()
    );

    HttpResponse::Ok()
        .content_type("image/svg+xml")
        .append_header(("Cache-Control", "no-cache"))
        .append_header(("Pragma", "no-cache"))
        .append_header(("Expires", "0"))
        .body(svg)
}

#[actix_web::main]
async fn main() -> std::io::Result<()> {
    env_logger::Builder::from_env(Env::default().default_filter_or("info")).init();

    let bind_address = std::env::var("BIND_ADDRESS").unwrap_or_else(|_| String::from("127.0.0.1"));
    let server = HttpServer::new(|| {
        App::new()
            .wrap(middleware::Logger::default())
            .service(handle_request)
    })
    .bind((bind_address.as_str(), 41880))?;

    println!("Server running at http://{}", server.addrs()[0]);

    server.run().await
}
이제 HTTP 요청을 받았을 때 SVG 이미지를 반환하도록 하면 기본적인 준비가 끝났습니다.
BIND_ADDRESS를 받는 부분은 Dockerizing을 위한 거라, 환경에 따라 불필요할 수 있습니다.
캐싱 메커니즘 추가
이 로직의 주요 단점은 느린 외부 API에 직접적으로 의존한다는 점입니다.
매 요청마다 API 서버로 요청을 보내고, 이미지를 다시 요청한 뒤, SVG를 렌더링하여 응답합니다. 제 환경에서는 약 2.6초가 소요되었습니다.
가만 생각해보면, 모든 요청에 대해 높은 무작위성을 유지할 필요는 없습니다.
특히 Rust로 만든 API가, 응답을 생성하는 데만 2초 이상 투자해야 하는 상황이라면 더더욱 그렇습니다.
- 전역에 API 응답 결과와 인코딩된 이미지를 캐싱한다.
- 사용자의 요청을 받으면 1번에서 캐싱 된 결과로 렌더링을 진행한다.
- 응답한 직후, API로 요청을 보내 새 응답을 캐싱한다.
위와 같이 캐싱을 통해 응답 시간을 줄일 수 있을 것으로 생각했고, 실제로 2.6초에서 3.6ms로 응답을 만들어내는 데 걸리는 시간을 대폭 줄일 수 있었습니다.
#[derive(Clone)]
pub struct AppState {
    pub cache: Arc<Mutex<ResponseData>>,
    pub fetch_in_progress: Arc<AtomicBool>,
    pub handlebars: Arc<handlebars::Handlebars<'static>>,
}
위와 같이 여러 요청에 걸쳐 사용할 상태를 정의했습니다.
추가로, Arc를 통해 여러 thread에서 해당 값에 접근할 수 있도록 하였습니다.
pub async fn fetch_and_cache(State(state): State<AppState>) -> Result<ResponseData, Error> {
    let cache = state.cache.lock().unwrap();
    let cached_data = cache.clone();

    drop(cache);

    // Only spawn a new fetch if one isn't already in progress
    if !state.fetch_in_progress.load(Ordering::SeqCst) {
        state.fetch_in_progress.store(true, Ordering::SeqCst);
        // Should the response contain cached data, ensure to fetch the data in preparation for the next request
        spawn(async move {
            match fetch_random_food().await {
                Ok(new_data) => {
                    let mut cache = state.cache.lock().unwrap();
                    *cache = new_data;
                }
                Err(e) => {
                    error!("Error fetching data: {:?}", e);
                }
            }
            state.fetch_in_progress.store(false, Ordering::SeqCst);
        });
    }

    return Ok(cached_data);
}
다음으로 캐싱 로직입니다. 초기에는 AppState의 cache가 nullable한 값으로 설정했으나, cold start 해결을 위해 앱을 기동하는 시점에 데이터를 불러오도록 하였습니다.
이렇게 되면 상술한 것처럼 캐시된 데이터를 반환하고, 비동기 task를 생성하는 로직만 있으면 됩니다.
개선점
Mutex에 대한 에러 핸들링이나, Race condition에 대한 핸들링을 추가해볼 수 있지 않을까 싶습니다.
추가로, SVG를 만들 때 사용하는 값이 그리 많지 않은데, 데이터를 통째로 caching, cloning할 필요도 없을듯하긴 하네요.
관련해선 작업하는 대로 포스트를 업데이트해보도록 하겠습니다.
actix-web에서 axum으로
초기에는 상술한 것처럼 actix-web을 사용해 HTTP Request를 처리했습니다.
코드 스타일
// axum
use axum::{Router, routing::get};

let app = Router::new()
    .route("/", get(root))
    .route("/foo", get(get_foo).post(post_foo))
    .route("/foo/bar", get(foo_bar));

async fn root() {}
async fn get_foo() {}
async fn post_foo() {}
async fn foo_bar() {}

// actix web
use actix_web::{get, post, web, App, HttpResponse, HttpServer, Responder};

#[get("/")]
async fn hello() -> impl Responder {
    HttpResponse::Ok().body("Hello world!")
}

#[post("/echo")]
async fn echo(req_body: String) -> impl Responder {
    HttpResponse::Ok().body(req_body)
}

async fn manual_hello() -> impl Responder {
    HttpResponse::Ok().body("Hey there!")
}
actix web은 procedural macro를 통해 method를 정의하기에, 좀 더 친숙하고 직관적이었습니다.
// axum
async fn handle_request(
    query: Query<SVGOption>,
    State(state): State<AppState>,
) -> impl IntoResponse {
    let start_time = Instant::now();
    let handlebars = state.handlebars.clone();
    info!("Clone handlebars: {:?}", start_time.elapsed());
    let data = cache::fetch_and_cache(State(state)).await.unwrap();
    info!("Fetch and cache data: {:?}", start_time.elapsed());
    let svg = render::render_svg(handlebars, &data.meals[0], query.theme.clone());
    info!("Create svg image: {:?}", start_time.elapsed());

    let mut headers = HeaderMap::new();

    headers.insert("Content-Type", "image/svg+xml".parse().unwrap());
    headers.insert("Cache-Control", "no-cache".parse().unwrap());
    headers.insert("Pragma", "no-cache".parse().unwrap());
    headers.insert("Expires", "0".parse().unwrap());

    (StatusCode::OK, headers, svg)
}

// actix web
#[get("/")]
async fn handle_request(
    query: web::Query<SVGOption>,
    state: web::Data<AppState>,
) -> impl Responder {
    let start_time = Instant::now();
    let handlebars = state.handlebars.clone();
    info!("Clone handlebars: {:?}", start_time.elapsed());
    let data = cache::fetch_and_cache(state).await.unwrap();
    info!("Fetch and cache data: {:?}", start_time.elapsed());
    let svg = render::render_svg(handlebars, &data.meals[0], query.theme.clone());
    info!("Create svg image: {:?}", start_time.elapsed());

    HttpResponse::Ok()
        .content_type("image/svg+xml")
        .append_header(("Cache-Control", "no-cache"))
        .append_header(("Pragma", "no-cache"))
        .append_header(("Expires", "0"))
        .body(svg)
}
또한, Response를 만들 때도 Status, Header, Body를 훨씬 직관적으로 선언할 수 있습니다.
성능
하지만…둘의 성능 차이가 이렇게까지 클 줄은 몰랐습니다.
| axum | actix web | |
| Requests/sec | 274.99 | 54.88 |
| Transfer/sec | 42.80MB | 8.86MB |
wrk 로 12 thread에서 400 connection을 만들어 테스트했습니다.
꽤 큰 성능 차이를 보여줍니다.
사실 초기에 검증할 때 이 부분도 짚고 넘어갔어야 했는데…제 불찰이었습니다.
간단하게 성능 검증을 해보고, 바로 axum으로 노선을 변경했습니다.
코드 자체가 그리 많지 않고, 엔드포인트도 하나라 마이그레이션은 금방
끝냈습니다.
상세 데이터
Axum
| Thread stats | Avg | Stdev | Max | +/- Stdev |
| Latency | 782.57ms | 409.52ms | 2.00s | 64.35% |
| Req/Sec | 26.03 | 20.07 | 161.00 | 79.43% |
8277 requests in 30.10s, 1.26GB read
Socket errors: connect 158, read 0, write 0, timeout 258
Actix web
| Thread stats | Avg | Stdev | Max | +/- Stdev |
| Latency | 1.35s | 416.18ms | 2.00s | 63.77% |
| Req/Sec | 8.66 | 6.94 | 50.00 | 77.63% |
1642 requests in 30.10s, 266.85MB read
Socket errors: connect 158, read 0, write 0, timeout 1191
후기
사실 후기를 작성하기 민망할 만큼 간단한 애플리케이션이긴 하지만 - 요즘 같은 시대에는 더더욱, 생판 처음 보는 언어로 만들라고 했어도 어느 정도 만들었을듯합니다 - 이대로 끝내기는 아쉬우니 몇 자 덧붙여보겠습니다.
Rust의 패턴 매칭이나 타입 시스템에 다시금 감동하는 순간이었습니다.
TypeScript에서 수십 줄의 type을 작성하고 여러 유틸리티를 통해 간신히 쌓아 올리는 안정성을 꽤 직관적으로 작성할 수 있었습니다.
하나 로그 찍는 것부터 borrowing이란 장벽에 막힐 만큼 진입 장벽이 결코 낮진 않지만, 이런 면에서는 오히려 더 쉽게 코드를 이해할 수 있지 않나 싶습니다. 더군다나 - 제가 TypeScript를 메인으로 쓰며 Visual Studio에 대한 기억이 많이 희석된 요즘이라 - 8살짜리 언어라고는 믿기지 않을 만큼 성숙한 개발 환경을 제공받는 것도 아주 부러운 점 중 하나입니다.
이런 특성 때문에 사내에서 만든 API Doc parser(Swagger 파싱해 TypeScript 타입 파일들 생성 / 수정하는 등 역할 수행)같은 것들도 Rust로 교체해보면 재밌을 것 같네요. 지금은 JavaScript로 구현해뒀는데, 여러모로 지옥입니다.
마무리는 직접 그린 Ferris로 해보겠습니다.


댓글을 불러오는 중...