Visual regression test 도입기

Visual regression test 도입기
프론트엔드 개발을 진행하다 보면, Unit test 등을 진행하는 것 만으로는 충분하지 않은 경우가 많습니다.
가뜩이나 외부에 의존하는 것들이 많아 테스트도 어려운데, CSS 몇 줄 수정하다 레이아웃이 왕창 깨지는 경우가 생기면, 스트레스가 이만저만이 아닙니다.
이런 경우가 비단 저뿐만이 아니라, 여러 개발자들이 겪는 문제같아 도입할만한 방법론이 없나 찾아보던 중, 카카오 엔터테인먼트 기술블로그 글 을 보고 시각적 회귀 테스트를 알게 되었습니다.
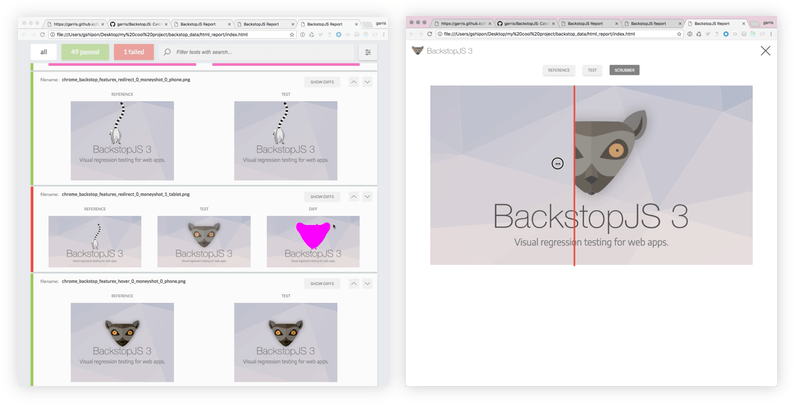
시각적 회귀 테스트는 브라우저 화면을 미리 캡처하여 저장해두고, 이전에 캡처한 화면과 비교하여 변경사항을 찾아내는 테스트 방법입니다.
이미 대부분의 프로젝트에 Storybook을 활용하고 있기에 Chromatic을 사용하면 꽤 쉽게 도입할 수 있었을듯 하지만, 자료를 외부에 공개하기도, 돈을 펑펑 쓰기도 그렇다 보니 직접 구축해보기로 했습니다.
- Turborepo
- Storybook
- BackstopJS
- GitHub Actions
들어가기 전, 위와 같은 환경에서 테스트를 구성하였습니다.
제 블로그도 같은 기술 스택을 사용 중이라, Repository
를 참고해 보시면 도움이 될 것 같습니다.
폴더 구조
📁 marshallku-blog-frontend
├─ 📂 apps
│  ├─ 📂 blog
│  ├─ 📂 docs
│  └─ 📂 visual-regression
└─ 📁 packages
docs에는 Storybook을, visual-regression에는 BackstopJS를 구성하였습니다.
굳이 별도의 앱으로 분리할 필요는 없지만, 둘의 성질이 많이 달라 파일들을 별도로 관리하고 싶은 마음에 분리하였습니다.
Storybook
설정이나 사용법 등은 docs
폴더를 참고해 주세요.
Document 작성
// apps/docs/stories/Typography.stories.tsx
import type { Meta, StoryObj } from "@storybook/react";
import Typography, { type TypographyProps } from "@ui/Typography";

const story: Meta<TypographyProps> = {
    component: Typography,
    title: "Typography/Typography",
    tags: ["autodocs"],
    parameters: {
        docs: {
            description: {
                component: "Displays text in a visually appealing way",
            },
        },
    },
};

export default story;

export const Default: StoryObj<TypographyProps> = {
    args: {
        children: "Hello World!",
    },
};
Storybook에서 평소랑 다를 것은 없습니다.
하지만, 기본적으로 CSS를 변경하는 등의 상황에 발생하는 문제를 미리 감지하고자하는 목적이기에, 가능한 많은 상황에 대한 Story를 미리 작성해 두시면 좋습니다.
BackstopJS
애플리케이션 기본 설정
// apps/visual-regression/package.json
{
    // ...
    "devDependencies": {
        "@types/backstopjs": "^6.1.3",
        "backstopjs": "^6.3.23",
    }
}
먼저, apps/visual-regression 폴더에 시각적 회귀 테스트를 위한 애플리케이션을 제작해야 합니다.
backstopjs, @types/backstopjs 두 패키지만 설치하면 기본적으로 설치해야할 패키지는 끝입니다.
/** @type {import('backstopjs').Config} */
const config = {
    id: "backstop_default",
    viewports: [
        {
            label: "phone",
            width: 320,
            height: 480,
        },
        {
            label: "tablet",
            width: 1024,
            height: 768,
        },
    ],
    onBeforeScript: "puppet/onBefore.js",
    onReadyScript: "puppet/onReady.js",
    scenarios: [],
    paths: {
        bitmaps_reference: "backstop_data/bitmaps_reference",
        bitmaps_test: "backstop_data/bitmaps_test",
        engine_scripts: "backstop_data/engine_scripts",
        html_report: "backstop_data/html_report",
        ci_report: "backstop_data/ci_report",
    },
    report: ["browser"],
    engine: "puppeteer",
    engineOptions: {
        args: ["--no-sandbox"],
    },
    asyncCaptureLimit: 5,
    asyncCompareLimit: 50,
    debug: false,
    debugWindow: false,
};

module.exports = config;
npx backstop init 명령어를 입력하시면 위와 같이 설정 파일과 함께 backstop_data 폴더에 BackstopJS가 사용할 파일들이 생성됩니다.
**/backstop_data/html_report
**/backstop_data/bitmaps_test
**/test-results
위와 같이 불필요한 폴더들을 .gitignore에 추가해 주고
// apps/visual-regression/backstop_data/engine_scripts/cookies.json
[
    {
        "domain": ".marshallku.com",
        "path": "/",
        "name": "key",
        "value": "value",
        "expirationDate": 1798790400,
        "hostOnly": false,
        "httpOnly": false,
        "secure": false,
        "session": false,
        "sameSite": "Lax"
    }
]
혹시 필요하다면, cookies.json에 쿠키를 추가해 줄 수 있습니다.
// apps/visual-regression/package.json
{
    // ...
    "scripts": {
        "test:visual-regression": "backstop test --config=\"backstop.config.js\"",
        "backstop:reference": "backstop reference --config=\"backstop.config.js\"",
        "backstop:approve": "backstop approve --config=\"backstop.config.js\"",
        "backstop:openReport": "backstop openReport --config=\"backstop.config.js\"",
        "clean": "rm -rf .turbo && rm -rf node_modules"
    },
}
다음으로, package.json에 위와 같이 BackstopJS에서 사용할 명령어들을 추가했습니다.
// ...
"scripts": {
    // ...
    "test:visual-regression": "turbo run test:visual-regression",
}
// ...
마지막으로, 프로젝트의 root에 있는 package.json에 test:visual-regression 명령어를 추가해 주시면, turbo를 통해 실행할 수 있습니다.
Express 서버 구성
Storybook에 작성한 문서를 확인해야 하기에, Express 서버를 구성해야 합니다.
// apps/visual-regression/server.js
const http = require("http");
const express = require("express");
const path = require("path");

const app = express();
const port = 8083;

const filePath = path.resolve("..", "docs", "storybook-static");

app.use(express.static(filePath));

app.use("*", (_, res) => {
    res.sendFile(path.join(filePath, "index.html"));
});

const server = http.createServer(app);

server.listen(port, () => {
    console.log(`Server is running on http://localhost:${port}`);
});
필요한 기능이라곤 Storybook 빌드 결과물을 그대로 서빙해주는 것 뿐이기에, 위와 같이 아주 간단하게 구성할 수 있습니다.
// turbo.json
"test:visual-regression": {
    "cache": false,
    "dependsOn": ["^build"]
},
Storybook의 빌드 결과물이 반드시 필요하기에, turbo.json에 위와 같이 의존성을 추가해 주시면 실수할 여지를 많이 줄일 수 있습니다.
// apps/visual-regression/package.json
"scripts": {
    "dev": "node server.js",
    // ...
},
마지막으로 서버를 기동할 명령어를 추가해 주시면 됩니다.
Storybook 빌드 결과 가져오기
이제 테스트를 진행할 시나리오들을 backstop.config.js에 추가해야 합니다.
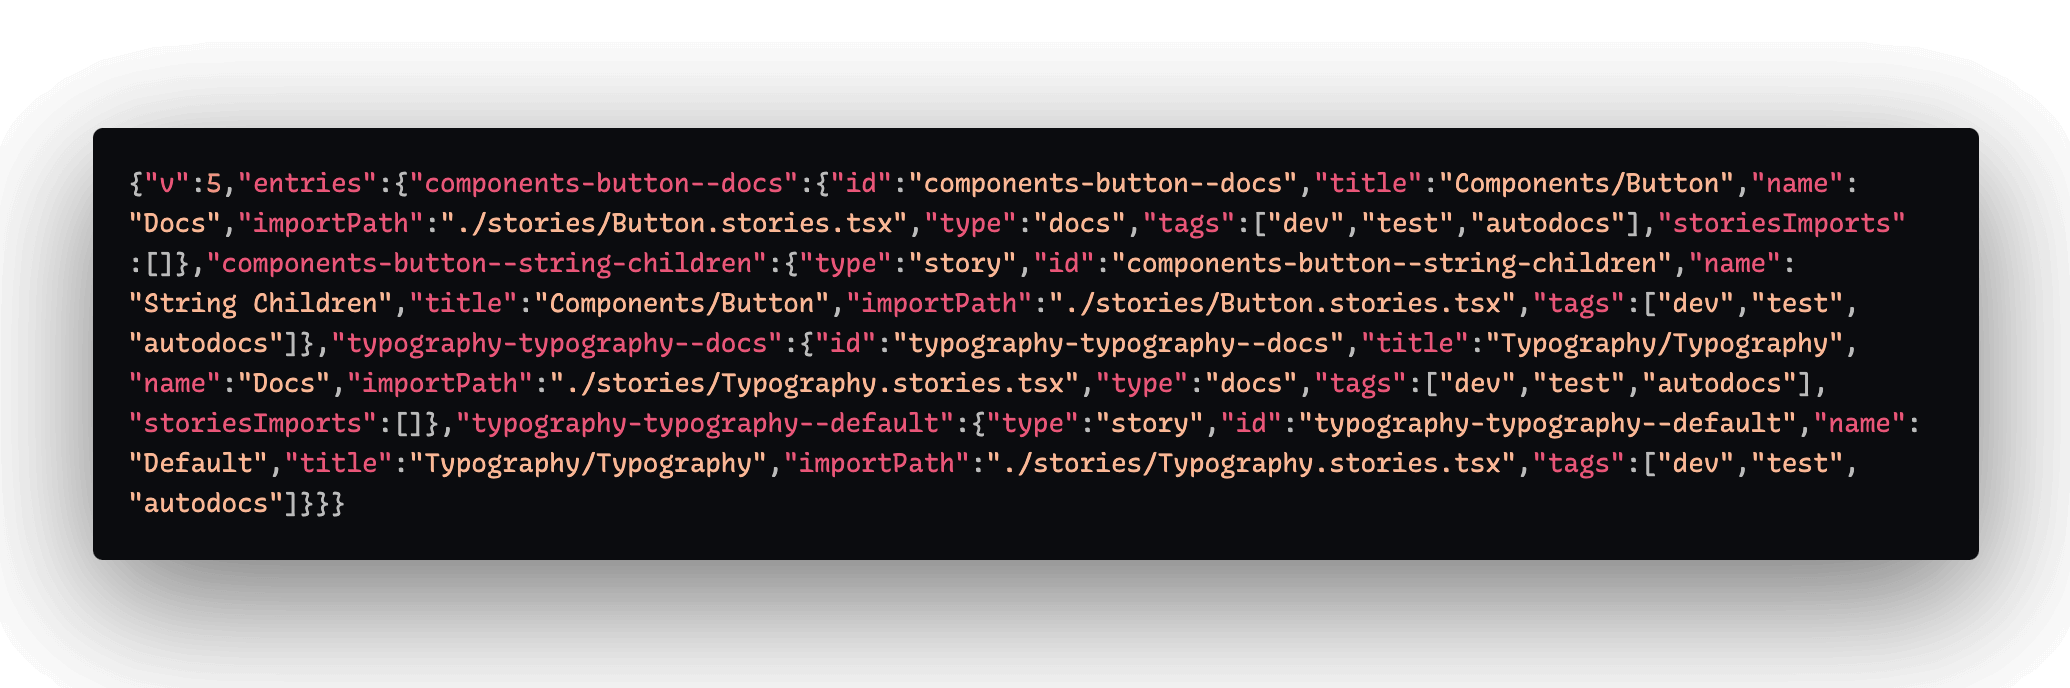
Storybook 빌드 결과물에는 index.json 파일이 있습니다.
해당 파일에는 Storybook에 작성한 문서들에 대한 정보가 있기에, 이를 이용해 시나리오를 추가할 수 있습니다.
// apps/visual-regression/backstop.config.js
const storyData = require("../docs/storybook-static/index.json");
const stories = Object.values(storyData.entries);
const blackList = [];
/** @type {import('backstopjs').Config} */
const config = {
// ...
scenarios: stories
.filter((story) => story.type !== "docs" && !blackList.includes(story.id))
.map((story) => ({
label: story.id,
cookiePath: "",
url: `http://localhost:8083/iframe.html?id=${story.id}&viewMode=story`,
referenceUrl: "",
readyEvent: "",
readySelector: "#storybook-root",
delay: 3000,
hideSelectors: [],
removeSelectors: [],
hoverSelector: "",
clickSelector: "",
postInteractionWait: 0,
selectors: [],
selectorExpansion: true,
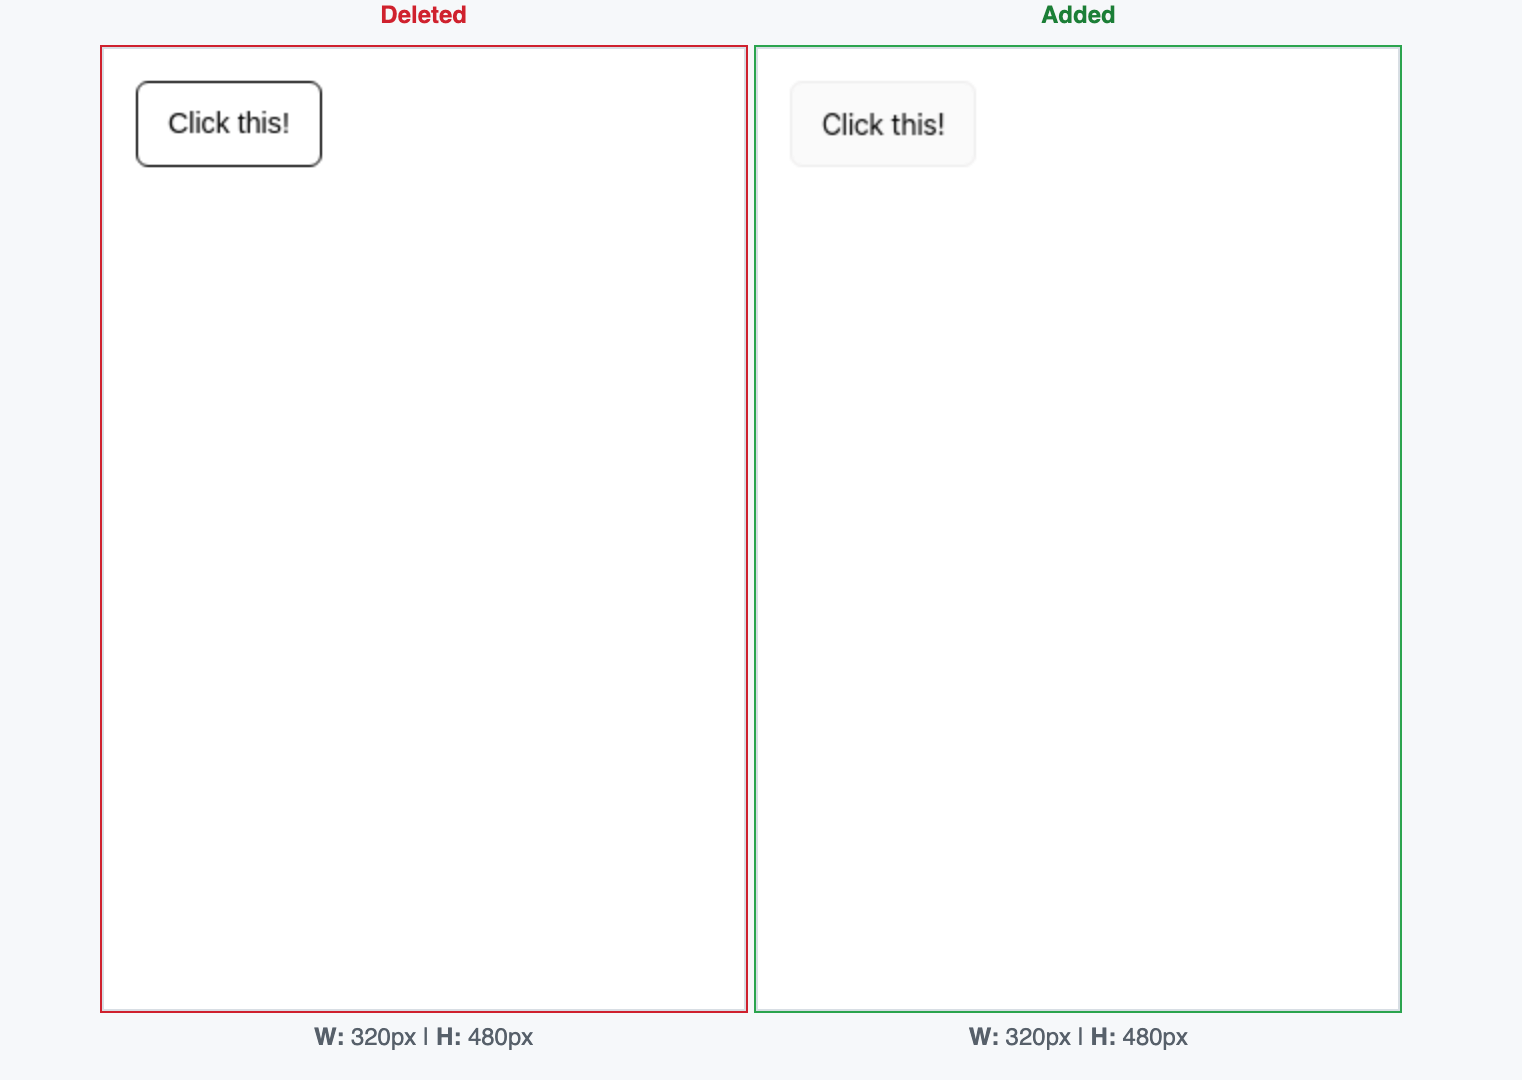
expect: 0,
misMatchThreshold: 0.1,
requireSameDimensions: true,
})),
// ...
};
위와 같이 index.json 파일을 불러와 시나리오를 추가해 주시면 됩니다.
문서 파일은 두 번 검사할 필요가 없으니 제거하고, 혹시 테스트가 필요 없는 경우에는 blackList에 추가할 수 있도록 구성했습니다.
Storybook 내부에 사용되는 iframe.html 파일을 사용하면 별다른 노력을 들이지 않아도 접속할 수 있는 주소를 얻을 수 있습니다.
테스트 실행
여기까지 완료되었으면, 테스트를 실행해볼 수 있습니다.
로컬에서 테스트를 실행하려면, backstop:reference 명령어를 실행해 기준이 될 파일들을 생성하고, test:visual-regression을 실행하면 됩니다.
GitHub Actions 파이프라인 구성
매번 로컬에서 테스트를 실행할 순 없으니, GitHub Actions를 통해 자동화하였습니다.
더불어 컨테이너 환경에서 실행되기에, 별도로 이미지를 생성하지 않아도 일관된 결과를 얻을 수 있습니다.
변경 사항 테스트
# .github/workflows/check_pr.yml
name: Check PR

on:
    pull_request:

env:
    CI: true

jobs:
    visual-regression-test:
        name: Run visual regression test
        runs-on: ubuntu-latest
        steps:
            - uses: actions/checkout@v4
            - uses: marshallku/actions/setup-pnpm@master
            # Puppeteer 설치
            - name: Install puppeteer
              run: npx puppeteer browsers install chrome
            # Express 서버 실행
            # Background에서 실행해야 하기에 &를 추가
            - name: Run backstop server in background
              run: pnpm dev --filter @marshallku/visual-regression &
            # Storybook 빌드
            # `turbo.json`에 의존성을 추가했기에, 굳이 추가하지는 않아도 됨
            - name: Build apps and packages without blog
              run: pnpm build --filter !@marshallku/blog
            # 테스트 실행
            - name: Run test
              id: test
              # 의도된 변화인 경우도 많기에, 실패해도 계속 진행
              continue-on-error: true
              run: pnpm test:visual-regression
            # 테스트 결과를 PR 댓글로 추가
            - name: Check test result
              if: ${{ !cancelled() }}
              uses: thollander/actions-comment-pull-request@v2
              with:
                  message: |
                      Test result - ${{ steps.test.outcome }}

                      You can check results [here](https://github.com/${{ github.repository }}/actions/runs/${{ github.run_id }})
            # 테스트 결과 업로드
            - name: Upload test results
              uses: actions/upload-artifact@v4
              if: ${{ !cancelled() }}
              with:
                  name: backstop-data
                  path: apps/visual-regression/backstop_data
                  retention-days: 30
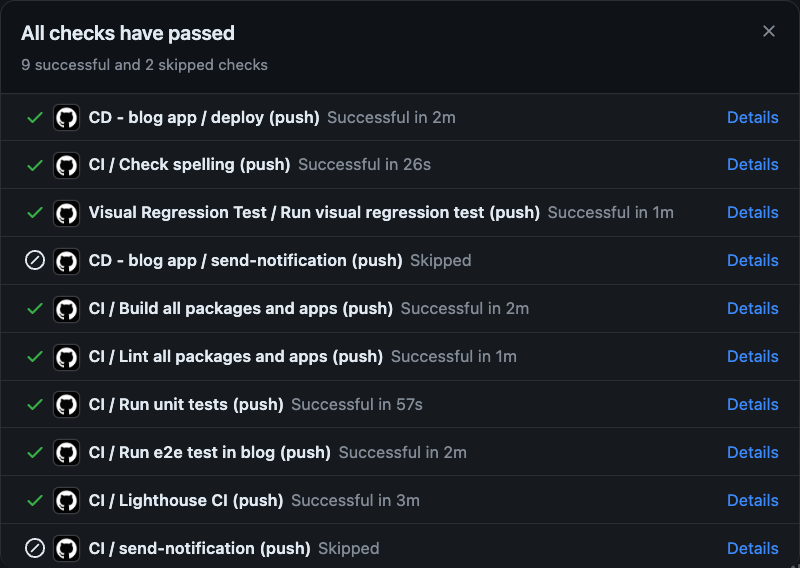
Pull Request를 생성했을 때, 변경 사항을 테스트하기 위한 파이프라인을 구성했습니다.
기존에 생성되어있던 Reference 스크린 샷과, 변경된 스크린 샷을 비교해 결과를 확인하고, PR에 댓글로 결과를 추가해 줍니다.
제 개인 블로그에 간단하게 적용한 파이프라인이라, 테스트 결과를 단순히 GitHub Artifact에 업로드하는 방향으로 구성했습니다.
여러 사람이 작업하는 경우에는, S3에 파일을 업로드하고 주소를 댓글로 추가하는 방향으로 구성해보실 수 있습니다.
Reference 파일 업데이트
PR이 승인되고, master 브랜치가 업데이트되면 이제 Reference 파일을 업데이트해야 합니다.
#!/bin/bash

if [[ -z $(git status --porcelain) ]]; then
    exit 0
fi

files_to_commit=${FILES:-"-A"}

git config user.name github-actions[bot]
git config user.email 41898282+github-actions[bot]@users.noreply.github.com
git add "$files_to_commit"
git commit -m "$MESSAGE"
git push
먼저, Reference 파일을 업데이트하고, 이를 커밋하기 위한 스크립트를 추가했습니다.
# .github/workflows/visual_regression.yml
name: Visual Regression Test

on:
    push:
        branches:
            - master
    workflow_dispatch:

concurrency: ${{ github.workflow }}-${{ github.ref }}

jobs:
    test:
        name: Run visual regression test
        runs-on: ubuntu-latest
        steps:
            - uses: actions/checkout@v4
            - uses: marshallku/actions/setup-pnpm@master
            - name: Install puppeteer
              run: npx puppeteer browsers install chrome
            - name: Run backstop server in background
              run: pnpm dev --filter @marshallku/visual-regression &
            - name: Build apps and packages without blog
              run: pnpm build --filter !@marshallku/blog
            - name: Run test
              id: test
              continue-on-error: true
              run: pnpm test:visual-regression
            - name: Create commit comment
              if: ${{ !cancelled() }}
              uses: peter-evans/commit-comment@v3
              with:
                  body: |
                      Visual regression test result - **${{ steps.test.outcome }}**
            # PR 확인할 때와 달리, reference 파일을 업데이트
            - name: Approve results
              if: ${{ steps.test.outcome == 'failure' }}
              run: |
                  cd apps/visual-regression
                  pnpm backstop:approve
            - name: Commit changes
              if: ${{ steps.test.outcome == 'failure' }}
              run: bash .github/scripts/commit.sh
              env:
                  MESSAGE: "Update visual regression test results"
다음으로, PR을 확인할 때와 마찬가지로 테스트를 수행하는 파이프라인을 추가했습니다.
다만, PR을 확인할 때와 달리, 테스트를 진행한 뒤 그 결과를 바탕으로 Reference 파일을 업데이트하고, 이를 커밋하는 작업을 추가했습니다.
댓글에 상세하게 테스트 결과 추가

여기까지 진행한다면, 위와 같이 아주 간단한 형태로 성공 / 실패 여부만 댓글로 추가됩니다.
하지만 좀 더 자세하게 각 컴포넌트별로 테스트 결과를 확인하고 싶다면, 추가적인 작업을 진행하실 수 있습니다.
{
  "testSuite": "BackstopJS",
  "tests": [
    {
      "pair": {
        "reference": "../bitmaps_reference/backstop_default_components-button--string-children_0_document_0_phone.png",
        "test": "../bitmaps_test/20240611-074438/backstop_default_components-button--string-children_0_document_0_phone.png",
        "selector": "document",
        "fileName": "backstop_default_components-button--string-children_0_document_0_phone.png",
        "label": "components-button--string-children",
        "requireSameDimensions": true,
        "misMatchThreshold": 0.1,
        "url": "http://localhost:8083/iframe.html?id=components-button--string-children&viewMode=story",
        "referenceUrl": "",
        "expect": 0,
        "viewportLabel": "phone",
        "diff": {
          "isSameDimensions": true,
          "dimensionDifference": {
            "width": 0,
            "height": 0
          },
          "misMatchPercentage": "0.00"
        }
      },
      "status": "pass"
    },
  ],
  "id": "backstop_default"
}
테스트가 완료되면 backstop_data/bitmaps_test/$TEST_ID/report.json 파일에 위와 같이 테스트 결과가 저장됩니다.
이를 파싱하여 PR 댓글에 추가해주는 작업을 추가해보겠습니다.
const fs = require("fs/promises");
const path = require("path");

async function main() {
    const reportPath = path.resolve(__dirname, "backstop_data/bitmaps_test");
    const directories = await fs.readdir(reportPath);
    const lastDirectory = directories[directories.length - 1];
    const report = JSON.parse(await fs.readFile(path.resolve(reportPath, lastDirectory, "report.json"), "utf-8"));
    const sorted = report.tests.sort((a) => (a.status === "fail" ? -1 : 0));
    const tableHeads = ["Component", "Story", "Success", "Viewport", "MisMatch Percentage"];
    const tableData = [
        tableHeads,
        tableHeads.map(() => "-"),
        ...sorted.map(({ pair, status }) => [
            pair.label.split("--")[0],
            pair.label.split("--")[1],
            status === "fail" ? "❌" : "✅",
            pair.viewportLabel,
            pair.diff ? `${pair.diff.misMatchPercentage}%` : "100%(no reference)",
        ]),
    ];

    console.log("TEST_RESULT<<EOF");
    console.log(tableData.map((row) => `| ${row.join(" | ")} |`).join("\n"));
    console.log("EOF");
}

main();
위와 같은 스크립트를 작성하면 가장 최근에 생성된 리포트를 파싱해 테스트 결과를 출력할 수 있습니다.
Multiline string을 사용하기에 output보다는 env가 훨씬 편해서 TEST_RESULT라는 환경 변수에 결과가 저장되도록 했습니다.
사족으로, ::set-output 사용하던 시절에는 0%A로 개행 문자를 추가할 수 있었는데, >> "$GITHUB_OUTPUT"으로 output 파일에 추가하는 방식으로 업데이트되고 개행 문자 처리가 아주 귀찮아졌습니다…
출력할 결과에는 컴포넌트 명, 컴포넌트 스토리 이름, 성공 여부, 뷰포트, 부정합 정도를 포함해 구성했습니다.
만약 추가적인 정보가 필요하시다면, tableHeads와 tableData를 수정하시면 됩니다.
console.assert(tableHeads.length === tableData.length, "Table heads and data length should be same");
만약 수정하신다면, 위와 같이 테이블 헤드와 데이터의 길이가 같은지 확인하는 코드를 추가해 주시면 좋습니다.
- name: Check test result
  id: check-test-result
  run: |
      OUTPUT=$(node apps/visual-regression/reportResult.js)
      echo "$OUTPUT" >> "$GITHUB_ENV"
- name: Create commit comment
  if: ${{ !cancelled() }}
  uses: peter-evans/commit-comment@v3
  with:
      body: |
          Visual regression test result - **${{ steps.test.outcome }}**

          ${{ env.TEST_RESULT }}
이제 yaml 파일에서 해당 스크립트를 실행하고 환경 변수에 저장하는 작업을 추가하고, body를 구성할 때 ${{ env.TEST_RESULT}}를 추가해 주시면 됩니다.
결과

여기까지 완료했다면, PR을 생성했을 때나, master에 커밋했을 때 위와 같이 Visual Regression Test 수행 결과를 댓글로 등록해 주고,
Master 브랜치가 업데이트되면 자동으로 reference 파일을 업데이트 해주게 됩니다.
마치며
항상 프론트엔드에서의 테스팅에 대해 고민이 많았습니다.
백엔드에서 코드를 작성할 땐 나름 입출력이 정확하고, 환경을 제가 제어할 수 있으니 명확하게 테스트할 수 있었지만, 프론트엔드는 거대하게 상태가 관리되고, 브라우저라는 외부 환경에서 동작하기에 테스트가 어려운 경우가 많았습니다.
더군다나, 로직 수정 중에 발생하는 레이아웃 관련 Side Effect는 눈으로 확인해야만 하는 경우가 꽤 많았습니다.
하지만 시각적 회귀 테스트를 도입하며 UI에 발생하는 문제를 사전에 감지하고, 효율적으로 관리할 수 있게 되었습니다.
또한, CI 파이프라인에 이 과정을 추가할 수도 있기에, 개발 프로세스 전반에서 발생할 수 있는 UI 관련 버그를 줄일 수 있게 되었습니다.
입출력이 정확한 함수들에 유닛 테스트를 추가해 두고, 핵심 로직에 Playwright 등을 사용해 E2E 테스트를 추가한 뒤, 시각적 회귀 테스트까지 추가해 두니 코드 변경에 대한 부담이 여러 방면에서 많이 줄어든 것 같습니다.
여담으로, 이렇게까지 복잡할 필요가 없는 애플리케이션인데 블로그에 push 한 번 하면 돌아가는 CI 파이프라인이 이렇게나 많아져 버렸습니다.


댓글을 불러오는 중...